it offers a simple way to achieve a variety of common JavaScript tasks quickly and consistently, across all major browsers and without any fallback code needed.
It useful for:
Select elements
Problem tasks
Handle events
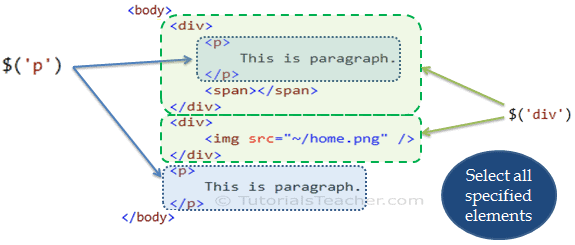
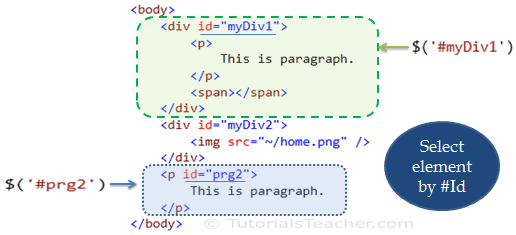
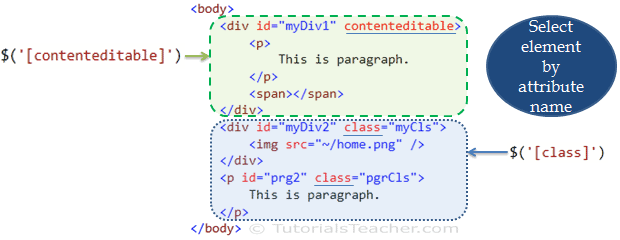
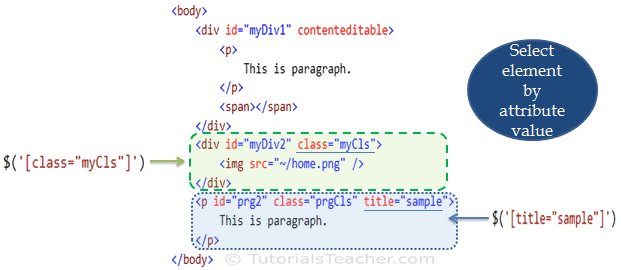
The jQuery library harnesses the power of CSS selectors to let us quickly and easily access elements or groups of elements in the Document Object Model (DOM).
A jQuery Selector is a function which makes use of expressions to find out matching elements from a DOM based on the given criteria. Simply you can say, selectors are used to select one or more HTML elements using jQuery. Once an element is selected then we can perform various operations on that selected element.
jQuery selectors start with the dollar sign and parentheses − $().
Since jQuery was created, modern browsers have implemented the querySeLector () and querySeLectorA11 () methods to let developers select elements using CSS syntax. However, these methods are not supported in older browsers.
jQuery API includes built-in function ready(), which detects whether a particular element is ready (loaded) or not.
The html () and text () methods both retrieve and update the content of elements. This page will focus on how to retrieve element content.
.html() : When this method is used to retrieve information from a jQuery selection, it retrieves only the HTML inside the first element in the matched set, along with any of its descendants.
.text() When this method is used to retrieve the text from a jQuery selection, it returns the content from every element in the jQuery selection, along with the text from any descendants.
.replaceWith() : This method replaces every element in a matched set with new content. It also returns the replaced elements.
.remove() This method removes all of the elements in the matched set.
Inserting new elements involves two steps:
Create the new elements in a jQuery object
Use a method to insert the content into the page.
We can use the following methods to add the content to the DOM tree:
.before() This method inserts content before the selected element(s) .
.prepend() This method inserts content inside the selected element(s),after the opening tag.
.after() This method inserts content after the selected element (s).
.append() This method inserts content inside the selected element(s), before the closing tag.
There are also .prependTo() and .appendTo() methods. They work the other way around from • prepend () and • append () . So:
a. prepend (b) adds b to a
   a.prependTo{b) adds a to b
   a. append (b) adds b to a
   a.appendTo(b) adds a to b
We can create attributes, or access and update their contents, using the following four methods:
.attr() This method can get or set a specified attribute and its va lue. To get the value of an attribute, you specify the name of the attribute in the parentheses.
.removeAttr() This method removes a specified attribute (and its value). You just specify the name of the attribute that you want to remove from the element in the parentheses.
.addClass() This method adds a new value to the existing value of the cl ass attribute. It does not overwrite existing values.
.removeClass() This method removes a value from the cl ass attribute, leaving any other class names within that attribute intact.
The .css () method lets you retrieve and set the values of CSS properties.
jQuery allows you to recreate the functionality of a loop on a selection of elements, using the .each () method.
The .on () method is used to handle all events.Every event handling function receives an event object. It has methods and properties related to the event that occurred.the .on () method has two optional properties that let you: Filter the initial jQuery selection to respond to a subset of the elements; Pass extra information into the event handler using object literal notation.
.show() Displays selected elements. .hide() Hides selected elements. .toggle () Toggles between showing and hiding selected elements.
The .animate() method allows you to create some of your own effects and animations by changing CSS properties.
The position of < script > elements can affect how quickly a web page seems to load.
6 Reasons for Pair Programming:
Pair programming is the practice of two developers sharing a single workstation to interactively tackle a coding task together.
How does pair programming work?
Pair programming commonly involves two roles: the Driver and the Navigator. The Driver is the programmer while the Navigator guide the Driver but does not provide any direct input to the computer.
Why pair program?
Greater efficiency : pair programing takes slightly longer, but produces higher-quality code that doesn’t require later effort in troubleshooting and debugging.
Engaged collaboration.
Learning from fellow students:the developers in a pairing have different skill sets. If one programmer is more experienced in a certain skill, they can teach a student who is less familiar with that area.
Pair programming is great for improving social skills.
Job interview readiness : Pair programming strengthens all skills for most roles in companies such as the ability to work with and learn from others and stellar communication skills .